
| |||||||||||||
By Hans Bachmeier, product manager, Miller Electric Mfg. Co.
Metal art takes on many forms, everything from wall hangings to picture frames to fireplace screens. Just ask Jim Truett, a district sales manager for Miller Electric Mfg. Co. by day and artist in his spare time from his Huntsville, Utah, home.
Truett knows his way around a welding power source and its allied tools, consumables and equipment. His job mandates it. But its Truetts singular ability to combine hardcore metalworking and art that makes his particular specialty so unique.
As his tools of choice to help him create his art, Truett uses a Miller Spectrum® 375 CutMateTM air plasma cutter and Millermatic® All-in-One wire welding power source.
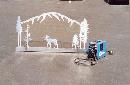
For a recent project, the material Truett selected was 12-gauge mild steel plate for a 40 x 64-inch screen that adorns a stone fireplace. His objective was to incorporate a scene of snow-capped mountains that sits one inch below the bottom of each stone on the upper edge of the fireplace.
The goal is to see the fireplace through the top of the mountains, Truett said. Trees on the outside edges of the screen will go up the side of the river rock in the fireplace to give the scene more depth.
Making It Happen: The Template
Truett started with a light cardboard-like material that is available at office supply stores. For this project he selected a combination of patterns for the fireplace. He gathered patterns from various sources and mixed them together to create a one-of-a-kind design for each fireplace.
When you have a large pattern like this you dont need the entire concept all at once, says Truett. You can take a tree pattern from one place and a wildlife pattern or a landscape pattern from something else and then put them together.
Truett explains that some patterns I draw and some patterns I just find in a magazine or on the Web. You might see part of a tree that you like and part of a tree that you dont. You use the part you like and draw the other part.
Along with the mountains and evergreen trees, this particular pattern includes a moose. I have a bunch of moose patterns, but this is the one I like best, Truett says. I was doing a show and a guy who had seen one of my fireplace screens comes up to me. He really liked it and we went over to his house to take down the dimensions of his fireplace. He wanted the moose in it. Truett admires this noble animal so much he calls his one-man operation The Metal Moose.
When its time to draw, Truett uses a Sharpie® pen or something with a sharp edge to trace the pattern on the material. Some people spray paint the outline and try to follow the pattern, but The problem there is that the heat of a plasma torch dissipates the lines; a Sharpie or another permanent fine-point marker works the best, Truett says.
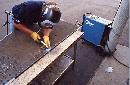
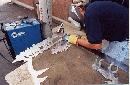
Once the outline is traced onto the metal its time to cut. In cutting, even how you hold the torch makes a difference, Truett says. Hold the torch straight up and down.
He explains the torch cant be held at an angle because a beveled pattern doesnt give the metal the depth required at the edge. The one thing you need to remember about cutting is this: If youre at an odd angle and you dont feel comfortable, stop. Just stop, reposition yourself, get comfortable and start cutting again, Truett says.
Trust Your Equipment
Truett points out the thing I like most about the Spectrum 375 is it gives you the power you want as well as the thin cut, so you can really fine-tune it and follow the line. Im right-handed, but I use my left hand and put my knuckles down on the back side to steady the torch and my right hand just pulls the trigger. Im actually using my left hand to follow the line. I try to have a 1/16-inch standoff.
He cautions against stopping and starting on a straight line. Instead, stop on an edge because that offers a natural break. And watch for signs of welding tip wear. What happens is you hold the torch straight up and down and then all of a sudden the cut starts beveling the material. Thats when you know its time to change your tip, Truett says.
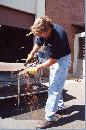
Next comes the grinding stage. First, Truett turns the pattern upside down so he can remove slag by using a piece of metal to knock it by tapping the metal frame. Slag left by plasma cutting is easy to remove. But the cuts are so intricate he cant get it all. So he uses a 4 1/2-inch grinder with a 40-grit sandpaper to mop all the edges down and make them smooth on the back side.
Once thats completed Ill concentrate on the outside edges, Truett says. Ill flip the frame over and start removing some mill scale to create a design. Truett explains the sheet metal he uses has mill scale on it, which is normally an imperfection. Grinding mill scale off metal is labor intensive, but it gives the finished product a shiny look. The mill scale also offers a gray tint to the fireplace, a contrast that the customer wants to keep in the finished piece. He uses his grinder at a 15-degree angle, running the grinder over the edges of the pattern and taking off a fraction of an inch.
We want this surface smooth because well lay the fire screening material on top, Truett says. We want a clean edge so we can tack the screen on it. After that were going to outline our edges and smooth all our cuts out.
He uses the grinder on nicks or hell spot weld an imperfection to fill it in, then grind it flat. When hes removing mill scale Truett uses a maxi disc with a 40-grit count and then switches to a 120-grit wheel to go over the entire frame and take out fine imperfections.
Your grinder is your friend. Think of it as you would an eraser on a pencilif you make a mistake the grinder can correct it, Truett says. If youre thinking about cutting slowly, dont do it because your hand will shake and the cuts will have wavy edges. If you have to, its OK to go 1/16-inch outside the pattern. Just keep going smoothly to achieve a straight line; the grinder will bring the cut back into the proportion you want when you end.
The Home Stretch
To create his tree effect, Truett employs an up and down motion to make it look like cascading evergreen branches; for the moose he uses the edge of the grinder to give depth to the hind quarter, and he creates the front of the moose in a sweeping side-to-side motion like a windshield wiper.
But I dont do the detail grinding until Ive tacked the screen to the back, he explains. I clamp the screen on the back to ensure that the sides and bottom are square. I use a Bright Mark® valve-action white marker to trace out where to cut the back of the screen and where it needs to be tack-welded to the back of the frame.
There are a number of advantages in using a plasma cutter with the built-in pilot arc controller, and one of them is the ability to cut expanded material such as a metal screen. Whats nice about the Spectrum 375 is that the pilot arc stays lit the entire time as were cutting through the screen material, which makes it easy to cut. Otherwise, the arc would go out and wed be stuck cutting by hand with a shears. Thats slow, tedious and really builds up a cramp.
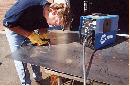
When it comes time to tack-weld the screen, Truett relies on his Millermatic all-in-one MIG unit because of its superior welding performance and consistent arc starts. He uses a small diameter welding wire .030 or .023 diameter ER70S-6, a versatile wire that can be used for high amperage spray transfer as well as produce smooth weld beads on sheet metal with short circuiting-type transfer.
While the screen can be welded directly to the frame, welding the screen without burning away the fine mesh can be difficult. To simplify the process and provide a more secure fastening mechanism, Truett now places a small washer (one with about a 1/4-in. hole) on top of the screen and fills in the hole as the basis for tack welds. He spaces washers 6- to 8-in. apart.
When tack welding, Truett ensures that the contact tip is recessed. Were doing a lot of flack-tacking, straight up and down tacking, and keeping the tip recessed keeps the wire from burning back into the tip, he says. If you do a lot of tacking, its probably best to have a quick-change auto hood so you dont have to put your hood up and down on every tack. A clean, flat heavy piece of steel plate is placed on the frame to aid in holding the screen down (see photo).
When making tack welds, the contact tip is recessed inside the nozzle about 1/8 inch and I use the outside of the nozzle to push down the screen/washer combination, pull the trigger and then wait a half-second before I lift the gun up to cool the weld. This helps prevent sticking the nozzle.
When setting the volts and amps on the front of the machine, Truett advises making sure the settings are low enough to tack the screen to the material with penetration, but not so high that you burn a hole in the screen (again, using a washer makes this less important). On his 250 amp/40-percent duty cycle machine, Truett sets the voltage at 16 and the wire feed speed at 175.
I always use 75/25 (argon/CO2) shielding gas because it runs cooler and the puddle wets out better on thin material, Truett says. For tack welding, .030-inch wire will work, but .024-inch wire works better because it takes less heat to melt and it wont burn your screen away.
After tack welding the back, the front will have some heat discoloration, so thats why I save the final grinding and polishing on the front side until last. Only then can I blend everything together.
The finished fireplace screen is then ready to take center stage as a conversation piece in its new home, and serve as a testament to Truetts skill and artistry.